
Today, after scoring a beautiful Hubert Bequet bowl for $3…

… I came home and proceeded with some overdue etching tests.
Although my tutorial method for etching produces great detail in fine lines, I wanted to see how it stands up to a need for deeper etching.
I made a pattern, then was going to test six pieces of metal, three with ironed on PNP and three with laminator adhered PNP.
But after seeing the results of just one session of ironing on the PNP…

… compared with the results of transferring the image with my laminator…

… I decided to forego the ironing altogether and just stick with the laminator.
I performed my etching three different ways.
The first, was to have my piece taped to the underside of a piece of Styrofoam, floating in a bath of PCB etchant (ferric chloride) for 90 minutes with frequent agitation (tapping the foam piece) and intermittent cleaning of debris (I lift the piece out of the etchant and spritz it with water, dislodging any removed copper and sludge).

The second method was to have my piece taped to the underside of a piece of Styrofoam, floating in a bath of PCB etchant (ferric chloride) to which I added citric acid. This was left for 60 minutes without agitation.

The third method took six minutes. It is the method outlined in my now archaic tutorial (sponge). It normally takes about 1-2 minutes but I wanted to go for that really deep etch so I repeated the method three times for a total of approximately six minutes.
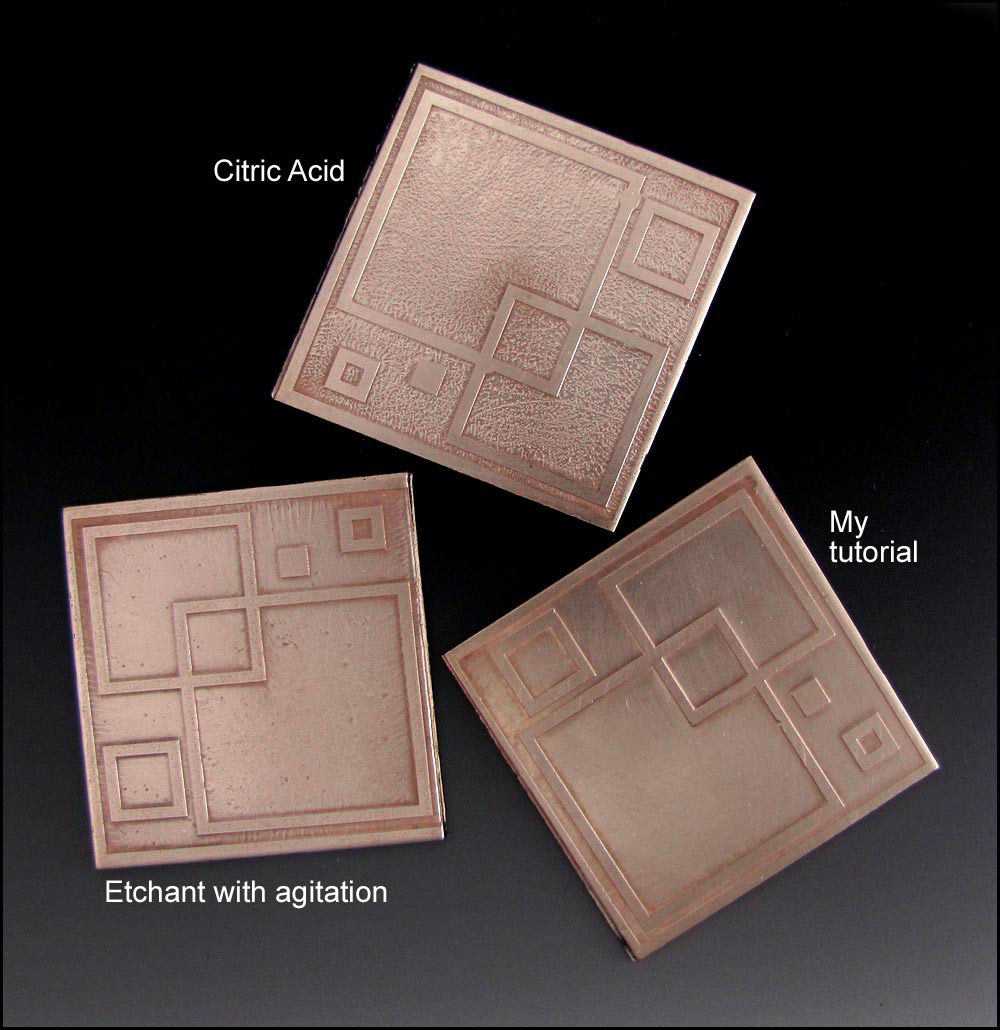
Here are the three pieces after being cleaned but before any patina has been applied. Click on the photo to see the full-size version.

As you can see, the method using etchant with agitation produced “puckering” lines and a few dots.
The method using etchant with citric acid produced a textured background.
The quick sponge method produced no puckering or texture.
I rather like the effect of the citric acid method and may use that in the future when desired.
After that, I wanted to see how deep the etch was in the three methods.


They all seemed to achieve a nice, deep etch. The citric acid method being the shallowest of the three, with 90 minute method coming in second, and my tutorial method having the deepest etch.
That’s good. My plan is to try enameling in the channels tomorrow.
The good news is that whether I etched for 6 minutes or 90 minutes, the resist never weakened. If I didn’t mind the puckering, I could try method #1 for 2-3 hours, just to test the resist.
And just like my purposefully using the citric acid-produced background texture, I find the puckering effect works quite well in certain pieces.
Now this is what I’ve been doing in the evenings, after work hours. There's something about Viking knit I really, really like.
Note: You can click on any jewelry photo to see if the piece is still available (or to get more info/photos). To see everything that is currently available, click here.

Until next time!

… I came home and proceeded with some overdue etching tests.
Although my tutorial method for etching produces great detail in fine lines, I wanted to see how it stands up to a need for deeper etching.
I made a pattern, then was going to test six pieces of metal, three with ironed on PNP and three with laminator adhered PNP.
But after seeing the results of just one session of ironing on the PNP…
… compared with the results of transferring the image with my laminator…
… I decided to forego the ironing altogether and just stick with the laminator.
I performed my etching three different ways.
The first, was to have my piece taped to the underside of a piece of Styrofoam, floating in a bath of PCB etchant (ferric chloride) for 90 minutes with frequent agitation (tapping the foam piece) and intermittent cleaning of debris (I lift the piece out of the etchant and spritz it with water, dislodging any removed copper and sludge).
The second method was to have my piece taped to the underside of a piece of Styrofoam, floating in a bath of PCB etchant (ferric chloride) to which I added citric acid. This was left for 60 minutes without agitation.
The third method took six minutes. It is the method outlined in my now archaic tutorial (sponge). It normally takes about 1-2 minutes but I wanted to go for that really deep etch so I repeated the method three times for a total of approximately six minutes.
Here are the three pieces after being cleaned but before any patina has been applied. Click on the photo to see the full-size version.
As you can see, the method using etchant with agitation produced “puckering” lines and a few dots.
The method using etchant with citric acid produced a textured background.
The quick sponge method produced no puckering or texture.
I rather like the effect of the citric acid method and may use that in the future when desired.
After that, I wanted to see how deep the etch was in the three methods.
They all seemed to achieve a nice, deep etch. The citric acid method being the shallowest of the three, with 90 minute method coming in second, and my tutorial method having the deepest etch.
That’s good. My plan is to try enameling in the channels tomorrow.
The good news is that whether I etched for 6 minutes or 90 minutes, the resist never weakened. If I didn’t mind the puckering, I could try method #1 for 2-3 hours, just to test the resist.
And just like my purposefully using the citric acid-produced background texture, I find the puckering effect works quite well in certain pieces.
Now this is what I’ve been doing in the evenings, after work hours. There's something about Viking knit I really, really like.
Note: You can click on any jewelry photo to see if the piece is still available (or to get more info/photos). To see everything that is currently available, click here.
Until next time!
Beautiful pieces Laura...love that Viking Knit bracelet!
ReplyDeleteI've had mixed results with copper etching. I'm looking forward to reading about your methods!
LOVE this. And I would never have thought to use styrofoam!
ReplyDeleteEtching is definitely on my "to do" list - wish the list just wasn't soooo long. I love your results - I like that textured effect too and I certainly admire your scientific method.
ReplyDeleteGreat bracelet! I’m part of the bead soup party. Looking forward to the reveals. I'm now following you. I have a new blog. Please consider following my jewelry blog. Thanks.
ReplyDeletehttp://vintagememoriesjewelry.blogspot.com