header info

To see what jewelry creations are currently available Click here!

Thursday, June 14, 2012

Continued Experiments in Enameling

I do the counter-enamel first, using a torch (it’s just easier).


Normally, I like to torch until the enamel is smooth (past the sugar stage, past the orange peel stage). But my logic for not taking it to the smooth stage for these counter-enamels was that if my piece is going into the kiln anyway… and this already enameled side is facing the hottest part of the kiln… then I don’t need to take the first enameling (flux… aka clear counter-enamel base coat) to the “smooth” stage. I can leave it somewhere between the sugar and orange peel stages since it’s going to get fired again when I put the piece into the kiln for the front enamel coats.

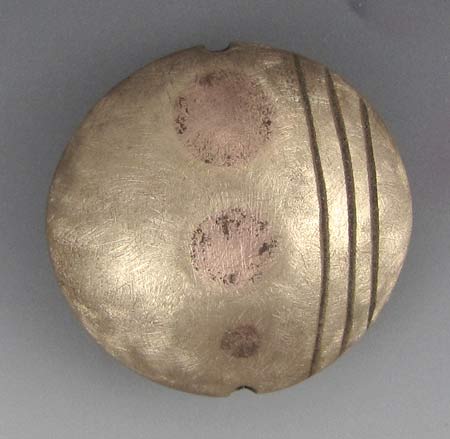
These are today’s test pieces after counter-enameling (you’re looking at the backs of the charms; they have one coat of flux on them).


You see more solder on some than others because I was trying out different ways of soldering.

These are the fronts of those same pieces. This is after firing (and after cooling). This is what the direct flame did to unprotected copper.


And the same fronts after I cleaned them (you have to clean the metal before you enamel it… and that includes cleaning between stages of enameling.


BTW, here are my handy (and well-labeled) mist bottles. I go through gallons of distilled water in my workshop. But you don’t want to get your distilled water mixed up with your KlyrFire.


So I took test pieces 1 and 2 and added some cloisonné wire as well as a couple balled up fine silver things. It was going to be three fine silver balls but one of them dropped into the Blu-Stic and sank to the bottom immediately.


I didn’t know some of my test pieces had pitted flux. These pieces are 17mm in diameter (about dime sized) and my close-up vision isn’t what it used to be. It wasn’t until I saw the photo close-up that I noticed the pitting. Otherwise I might have put another coat of flux on there.

I brushed the flux onto the fronts of my first two test pieces today and sifted it onto the second two.

But this brings me to another issue I need to solve. I am SO not mastering the use of KlyrFire. I realize I can’t work on flat pieces my whole life, but look at the result of brushed on KlyrFire and then sifting.


Sorry for the mega-sized photo, but I wanted you to see what it is I’m talking about. Why does it CLUMP up like snow? Bare patches, fat patches… I’d like to wonder if 80-mesh is just too fat, but it’s more likely USER error than materials error.

Anyway, here’s my first “wet-pack”.


I’m not sure how one is supposed to achieve a thin layer when wet-packing, but it’s definitely something I’ll have to practice.

And this is after firing that first layer of enamel.


And after firing with a second layer of enamel.


Here is test piece #2, after the first layer and then after the second layer as well as initial grinding down of the cloisonné wire.


I think I’m discovering that it’s infinitely easier to experiment with flat pieces rather than domed pieced. But I domed all my test pieces, so I’ll just forge ahead.

For my large piece (test piece 4), I really should have made a bigger nichrome holder, but I was impatient and just used the little one. The nichrome was touching the counter-enamel so stuck a bit (normally, the wire holder just touches the outer most edges of the piece, so no fusing of glass to nichrome wires).

And apparently I AM forced to build a new wire-holder thing in the middle of my enameling today because… duh!... the enamel that stuck to the wire when I fired my big piece… is still on the nichrome wire and thus sticking to other things (like my tweezers) when heated up.

I admit I’m not thrilled with the idea of heating nickel (which is what nichrome has in it), y’know what with the fumes and all. By that logic, however, maybe I’m not so thrilled with toasters either.

Anyway I had a thought/idea. When I torch enamel, I use a steel screen (see first photo). What if I took one of my torching screens and cut and shaped it as a trivet for my beehive? It’s worth a try.

Okay, cutting didn’t work, but freeing one of the wires from the mesh was all I needed.

Much sturdier (sorry, I didn’t get a picture… maybe next time).

This is as far as I got today. Tomorrow I’ll finishing enameling the second two test pieces and try to learn how to grind off the tops of the pieces so the cloisonné wires aren’t sticking out above the enamel and to clean off the bits of enamel that got onto my silver frames.

It doesn’t seem like much was accomplished, but that’s beginner’s enameling for you, I guess.

I’ll leave you with a photo I took the other night as the sun was setting and lighting up the sides of the Eucalyptus trees. It reminded me of a Maxfield Parrish painting so I grabbed my camera and voila!


Wednesday, June 13, 2012

First Experiments Enameling in my Ultralite Beehive Kiln

As much as I love torch-enameling, there are some limitations.

One is that I can only enamel very small pieces (well, unless I get out my very large torch, which I prefer not to do indoors).

The second and more important of the two problems is that I can only counter-enamel in black. When the flame is directly on the enamel, it turns various dark and unattractive colors. So I just use opaque black enamel which, when fired directly upon, ends up looking like opaque black enamel. But that’s limiting. Maybe you don’t always want black to be on the backside of every piece.


Insert: ultralite beehive kiln ($185)

My hope for a solution to my wish to learn kiln enameling, yet without firing up my oversized outdoor kiln. (Can’t enamel outside and no desire to run between he workroom and the patio kiln.)

This little kiln is actually mostly used for PMC, so I might give that a go at some point too.

Anyway, I needed something that could hold my work piece elevated above the kiln floor yet short enough to fit in this mini kiln. My enameling trivets are too big so I decided to fashion something from nichrome.

Seeking instant gratification, I looked up nichrome and discovered that toasters have nichrome wire in them and in perfect serendipity, we had recently purchased a new toaster and the old one was still in the garage.


The nichrome wires are the ones on the panels facing the toast… so in a 2-slot toaster, you’ve got three panels of nichrome wire (left, right and center).

Here’s the contraption I made after seeing a similar shape on Lillian Jone’s website. (Lillian Jones, btw, is the one who inspired me to try a beehive kiln for enameling in the first place.)


Here are the pieces I mentioned earlier that I’d made for testing. Copper disks with fine silver frame edges soldered on. (Yes, as you can see, I’m an amateur solderer.)


Before using one of my test pieces (these things took me a long time to make!), I took just a plain copper disk and prepped it for enameling.

So here’s the exciting, good news: I did achieve a clear counter-enamel coating on the back sides of both my test pieces. I’m so happy about these I can’t stop staring at them and smiling.


After counter-enameling on my plain copper disk, I sifted some opaque yellow onto the top side, placed it on my little nichrome wires, and placed it in the kiln.

After a few minutes, I removed it and although the enamel was smooth, the color was gray. I admit this surprised me a bit.

I sifted another coat of yellow on top of the gray coat and scratched a few wannabe sgraffito lines into that coat, then fired.


At least it came out yellow this time.

Next I took one of the test pieces that I messed up on (when doming it I distorted the copper in one place) and after counter-enameling the back (see above), I brushed some 50/50 klyrfire (because of the dome shape) on the top, sifted opaque red, and placed it in the kiln.

After it cooled, I repeated the red enamel.

So here’s the bad news…


What is up with the black/dark patches? It *may* be a combination of the copper base and too thin layers of enamel, but I thought I had pretty thick layers.  I admit I've not found as even a coating when using klyrfire as when merely sifting the enamel.

Well, that’s the end of my first experiments enameling with a kiln.

I want to eventually get some fatter gauge nichrome wire. My little contraption was pretty flimsy, making it hard for me to get the piece into and out of the kiln.

Monday, June 11, 2012

More Bronze Metal Clay Firing and Then Starting on Solding and Enameling

I want to say a big thank you to Hadar who continues to answer my questions in this process of learning more ins and outs of metal clay and firing schedules.

Round 6:

Decided to fire my next crop circle, which is much larger and much thicker than my test pieces.

The set-up…
Media: bronze with copper inlay, thick and larger piece
Kiln: top loading brick
Firing Container: round fiber firing container, no lid for phase 2
Charcoal: coconut shell carbon, acid washed
Phase 1 Firing: camp-stove for 45 minutes
Phase 2 Firing: full ramp to 1300 external pyrometer reading (kiln setting 1200), hold for 2 hours

I rigged a little collar of tin foil above the campstove knob and below the gas outlet. After 45 minutes of maximum heat, neither the knob nor the top of the propane canister were hot.


So I sat there for 45 minutes, watching my fiber box heat up, but never saw the “binder burning off” smoke. Which also means I never lowered the temp to minimum.

Since this is a much larger piece than my test pieces, I was expecting MORE smoke, not less. The only thing I can think of is that this piece sat on my shelf for a month; maybe that changed things.

I did smell the same smell as when the previous pieces were burning their binder, so after 45 minutes I looked and the piece was black. I decided to go ahead and transfer it to the kiln for phase 2 (two hours holding time at 1300 degrees).

I anticipated a not-fully sintered piece. After all, my first crop circle, fired at a much higher temp wasn’t sintered in the first go ‘round. Why would I think firing at a LOWER temp would produce BETTER results?

So I pull the thing out of the kiln as soon as phase 2 is over (I still am not sure about the protocol on that) and see that:
A) The charcoal is not bright orange as on previous occasions, and…
B) Charcoal bits are stuck to one side of my lentil


D’oh! I forgot to place it vertically rather than horizontally. Oh well, next time. And once I brushed the piece, there was only one piece of charcoal stuck to it and I didn’t see any pitting.

Although there is no warping or blistering (yay!), the copper inlay appears unsintered in spots...


... so I applied more copper clay and re-fire phase two.

Out of the kiln for the second time… brass brush with water, then sanding through all the grits (400, 600, 1000, 2000, 3000, 4000), then Baldwin’s patina and voila! New crop circle is done (and I really love it). I’m trying to add a chain and get it photographed so I can list it tomorrow (along with a Cleopatra style beaded necklace made last week… and just chillin’ on the mannequin).

After oohing and ahing over my crop circle, I got side-tracked with soldering and enameling. I made five bases (places for me to enamel). They are copper disks with fine silver frame edging (I like something that HOLDS the enamel in).

Today was cut out copper shapes, fuse fine silver into rings, shape rings, clean copper and silver, solder rings to disks, pickle, rinse, file and hole punch.

Tomorrow the plan is to clean the metal again, counter-enamel, add base coat enamel, add cloisonné wires, wet pack enamel, fire, repeat, finish.

It will be my first time trying to apply a counter-enamel that isn’t black. :-)

Sunday, June 10, 2012

Miniature Koi Pond Necklace and Comparison Shopping for Sterling Silver Clasps

Worked on some soldering last week. Was going to make a domed pendant that could be enameled, but here’s what happened to the dome:


As a fellow jewelry artist helpfully pointed out, the reason my silver solder jumped from the crevice (where it was … in front there, between the copper dome and the flat copper square) to the front of my dome is because the dome got hotter faster than the square, so the solder went to the hot spot… the dome. D’oh!

Seems to clear now, but at the time I was just so focused on other things. So next time I do this, I place my piece on a trivet or tripod screen and fire from underneath.

Thank you, JF!

Anyway, I did end up soldering that spot, but was still upset about the silver now fused to my copper dome, so I threw the piece in the pickle pot and went to bed.

Next morning I take the piece out and look it over and decide that the reverse side of it looks like a little pond. So I make three miniscule koi and place them at different levels in the pond using layers of resin, and voila!


While I’m waiting for the kiln to finish, let’s do a little comparison shopping.

16mm sterling silver tube clasp and 22mm sterling silver tube clasp

These are the kind I use on my netted weave bracelets:


Firemountain: 16mm is N/A, 22mm is $36.63
Beadaholique: 16mm is N/A, 22mm is $15.59
ArtBeads: 16mm is $9.49, 22mm is $11.17
JTV: 16mm is $8.99, 22mm is $10.99
Bluemud: 16mm is $8.96, 22mm is $10.30
FusionBeads: 16mm is $8.53, $10.56
House of Gems: 16mm is $8.17, $9.74
MonsterSlayer: 16mm is $8.00, 22mm is $10.05
RioGrande: 16mm is $6.24, 22mm is $7.52
Esslinger: 16mm is $5.90, 22mm is $8.40
Halstead: 16mm is $5.11, 22mm is $5.75
Thunderbird: 16mm is $4.81, 22mm $6.39

I ended up ordering from Rio because I got a wicked discount for ordering 5 (which was how many I needed). Got the 22mm for $6.08 each.

Tomorrow back to metal clay stuff.

Saturday, June 9, 2012

Crop Circle, Scarab, Snake, and Fear of Camping Stoves

Here’s a piece I listed recently that I had a lot of fun making. It’s a “Crop Circle” saucer-shaped pendant of carved bronze with copper inlay (click the pic for more info).


Then I made two fine silver pendants… the first is a scarab with Lapis accenting…


And a burnished snake on a glittery background…


I finished reading Hadar’s blog. I noticed (at the entry where she was testing the speed-cone firing method) a photo of their single burner camping stove and it’s got a metal plate that mine doesn’t.


Versus


Makes me wonder if not having that extra metal is what contributed to my on/off knob melting (and the top of the propane canister being REALLY heated (not something that thrills me).

You can't see it in that eye-level picture, but if you look at my set-up in yesterday's blog post, you'll notice there are large holes in the NWT camp stove's burner plate.

Then I noticed another set-up later on where there’s tin foil wrapped around the burner plate. Just more things to try.

One more discovery from Hadar’s website is a mention that another sign of over-firing is when mixed metal looks separated.


I won’t hijack one of Hadar’s photos without her permission, but trust me that her test pieces look amazing… totally smooth transition from copper to bronze and vice versa.

Could I still be over-firing at only 1300 degrees?!?!?

Unless I’m over-firing in the first phase and just can’t tell. Although my pieces didn’t look at black as Hadar’s did in her photo.

Well, if the wind gusts aren’t 40mph tomorrow, I’ll try firing one of my big crop circle lentils. Then later, I’ll make up some new test pieces maybe to continue fine-tuning the testing. I feel like my big piece will be okay at 1300 because it’s so much larger and thicker than my test pieces were and I was getting pretty dang close to optimal firing temps.

Friday, June 8, 2012

Round 5 Testing Firing Schedule for Bronze Metal Clay

Round 5…

The set-up…
Media: bronze and copper together, pieces 6 cards thick and little ball
Kiln: top loading brick
Firing Container: round fiber firing container, no lid (phase 2)
Charcoal: coconut shell carbon, acid washed
Phase 1 Firing: Shortened Phase 1 was 20 minutes on a camping stove with a lid (see previous post)
Phase 2 Firing: full ramp to 1300 external pyrometer reading (kiln setting 1200), hold for 1 hour

So far, I’m up to October 2010 in reading every post on Hadar’s blog.

Today during Phase 1, the test pieces started smoking a few minutes soon than yesterday (maybe around 12 or 13 minutes… I don’t remember now). And once again, when I tried to turn the knob to lower the flame to minimum at that point, I managed to turn it all the way off. GAH! I hate that. Because I hate taking my lighter and lighting that camp stove when it’s REALLY hot. It gets so hot, in fact, the on/off knob melted. Hmph! I may look into a higher quality camp stove.

Anyway, the pieces didn’t seem to smoke for very long compared with yesterday. Unsure how to interpret that.

So to reiterate, Phase 2 is at 1300 degrees for one hour.

I also figure that it’s okay to open the lid completely once the cycle is over because anything I can do to help cool the charcoal down may be good (considering I’m STILL over-firing).

So I open the lid and the charcoal is bright orange (not on fire, though). Also, it’s about one inch shorter.

Fingers crossed… can’t wait to finally have test pieces someday that aren’t over-fired.

Here is before (green state) and after firing (as well as brushing, grinding, sanding, and adding patina):


As you can see, I was at the end of my created test pieces. That ball of copper in bronze was just what was left of the two clays. I suppose I could have spent more time smoothing my test pieces out, but I was getting tired of spending time on things that were just frying up in the kiln.

The cracks you see in the “after” photos were the same cracks as in the “before” photos, so my pieces didn’t crack during the firings. But I’m curious what I can do to minimize that visible bit of separation between the copper and the bronze.

I do wonder if (well, I pretty much imagine) larger and/or thicker pieces WILL need more… something. More time, more heat. ??? We’ll see.

Remember, my crop circle, not a small piece by any means, came out fine (the second time… don’t think it sintered in the first firing, so repaired and refired).


But still, it was fired at a “kiln” temperature reading of 1470 (which would have really been about 1550), but that was in a steel container, not the new fiber box which requires slightly lower temps. But still… 1550 seems excessive for bronze metal clay.

Honestly, this stuff CAN get confusing.

Anyway, much better results than before. Now I will work to refine the whole system. Oh yeah, and I have two more crop circles to fire. I’m totally guessing they will not sinter at 1300 degrees.


Thursday, June 7, 2012

Round 4 of Test Firing Bronze Metal Clay

Round 4…

The set-up…
Media: bronze and copper separately and together, both pieces 6 cards thick
Kiln: top loading brick
Firing Container: round fiber firing container, no lid (phase 2)
Charcoal: coconut shell carbon, acid washed
Phase 1 Firing: Shortened Phase 1 was 25 minutes on a camping stove with a lid (see details below)
Phase 2 Firing: full ramp to 1340 external pyrometer reading (kiln setting 1250), hold for 1 hour

So here we are again, bound and determined.

I decided to try phase one with Hadar’s shortened recommendation (aka “Pre-Firing Phase 1”). Hadar does have a video instruction of this on youtube. There is also a blog entry from her site with instructions/description.

One difference I found (which may have more to do with the fiber box I was using instead of a steel container) is that the instructions/video state it takes 3-5 minutes for the carbon to heat up, at which point you will see smoke (from the binder burning off). It took my set-up 15 minutes before the presence of smoke.

But when the smoke was done (another 5-7 minutes), I checked and my pieces were indeed dark, so I figured I had completed phase 1 (and if this works, it’s WAY better than firing up the kiln, having it on for 2-3 hours, then waiting for it to cool before moving on to phase 2).

And if nothing else, I’ve learned how to use a camping stove. :-P

I decided to do my phase 2 hold time for only 1 hour rather than 2. I have two dinky little people of testing material.

I just wanted to mention, the fiber box lid had a fuzzy side and a non-fuzzy side and I had no way of knowing which way was supposed to face in toward the bowl. Hmph! I probably used the thing upside-down and ruined it, but oh well.

This time my two test pieces are one copper in bronze, the other just bronze, both 6 cards thick.

Here’s what Phase 1 looks like in action.


The pieces are supposed to look dark (but not fire-scale dark) when they are done.


So out of the kiln after phase two, I have two pieces that look seriously less damaged than any of my previous test subjects.


Again, after brushing I did some intense sanding (dremel grinding) and the pieces appear fully sintered… but where did my copper go?

According to Hadar’s instructions (and I hope my interpretations are correct), the fact that the copper/bronze piece is domed (started off level) as well as the fact that my copper disappeared means I’m still over-firing. The pitting is my third clue.

Although the instructions state to lower the temp by 10 degrees for each test, I’ve been lowering the temp by A LOT more than that and am still over-firing so I’ll do like The Price is Right until I get it pretty close.

I haven’t had a test piece yet with indications of under-firing (I’ve had pieces like that so I have a basis for comparison), so I’ll keep lowering for now and keep my fingers crossed.

I *am* happy that the new super fast phase one firing seems to be a thumbs up. Yay!

Anyway, that’s it for now. Will do more testing tomorrow or Satruday.

The last of my toys has arrived (ultralite beehive kiln). After this, the only thing I can/should order for awhile is supplies.


This has been making the rounds on the internet.


I don’t know where it came from or what the story is behind it but isn’t it awesome? If anyone knows the backstory, please let me know. I’d love to find out who the original artist is.

Here is the orchid I was talking about on Facebook


I’m a confessed plant-killer, yet this thing survived (as a stick) through winter and began blooming a couple weeks ago. Yay! I hope I can continue to keep it alive.


Monday, June 4, 2012

More Bronze Metal Clay Firing Experiments and Kiln Testings


Second test batch still over-fired. (But I just found something online to possibly explain this… argh!)

At first I thought my copper hadn’t sintered (which REALLY confused me… if one can over-fire and one can under-fire at the same time???), but then I realized my impromptu sintering test was dumb.

As you can see in the “before” photo (the rectangle piece that is copper outside, bronze inside), I decided to apply pressure to that ripped corner (after firing, I mean) and sure enough I managed to break it off. I assumed this meant the copper hadn’t sintered, but then I read back on some of Hadar’s blogs and see that:
1) It is VERY possible to break fully-sintered metal clay pieces by hand or with pliers (jewelry doesn’t need to be indestructible… just healthy enough to serve its purpose as jewelry)
2) Sometimes the inside of fully-sintered pieces still looks powdery

Besides, I took that copper piece and used my grinding tool on it and it was copper all the way through without any patches of powder. So in my book, fully-sintered.

The set-up…
Media: bronze and copper separately and together, all pieces 6 cards thick
Kiln: top loading brick
Firing Container: round fiber firing container, no lid
Charcoal: coconut shell carbon, acid washed
Phase 1 Firing: full ramp to 1000 external pyrometer reading (kiln setting 870), hold for 2 hours (then opened the kiln and removed the bowl to cool)
Phase 2 Firing: full ramp to 1450 external pyrometer reading (kiln setting 1340) (although this is debatable), hold for 2 hours (did not open the kiln directly after firing)

I did notice, however, that my charcoal seems to be retaining its heat for a long time after the kiln is off. I didn’t hear the kiln beep (signaling the end of phase 2), but I went out about 2 hours after it was probably finished and when I lifted the lid saw that the charcoal was still bright (bright!) orange with extreme heat.

I’m suspecting that the over-firing has something to do with switching from a steel container to a fiber container.

And sure enough, I just found this on a website: “The manufacturer of the Fiber Container recommends an alternative firing method of firing without the lid and 25° F cooler than specified for the clay type. Container should be removed from the kiln immediately upon completion of the firing cycle. “

Here are the before firing, after firing and steel brushing photos.


It turns out I can sand the blisters and pitting down on the bronze (which also revealed that it was fully sintered), but that’s not an ideal situation as not all shapes of jewelry lend themselves to vigorous sanding.

I’m also spending a huge amount of time going back over Hadar’s blog… like practically from the beginning, because I have questions that I don’t know the answers to.

When Hadar introduced her Quick Fire bronze and copper clays, it was only a one-phase firing. But in the latest instructions, I see nothing that has a one-phase firing. I’ll continue reading the blog (in chronological order) to see if things changed along the way.

Round 3…

The set-up…
Media: bronze and copper separately and together, all pieces 6 cards thick
Kiln: top loading brick
Firing Container: round fiber firing container, no lid
Charcoal: coconut shell carbon, acid washed
Phase 1 Firing: full ramp to 950 external pyrometer reading (kiln setting 875)*, hold for 2 hours (then opened the kiln and removed the bowl to cool)
Phase 2 Firing: full ramp to 1380 external pyrometer reading (kiln setting 1300), hold for 2 hours (did open the kiln directly after firing)

(* Yesterday, when I fired at 870, I had an external pyrometer reading of 1000. Today, firing at 875 gives me an external pyrometer reading of 950 degrees. I wonder if it’s because the ambient temperature of the day is about 30 degrees cooler.)

I also raised the box about a half inch and put the pieces back to horizontal layout per Hadar’s online instructions.


Still mega pitting (and shrinkage). Still looks like over-firing, right? And yet phase one was at 950 (even accounting for the fiber box would only suggest I fire at 970, so still well below the worry zone). And phase two was 1380 which is way below 1470 (1440 adjusting for the fiber container).

This next photo shows you how I know my pieces ARE being sintered (which is one relief, at least). I’ve sanded down (you can tell how far down because in the bronze circle, I’ve sanded past the pitting!) and everything is still intact. All signs point to proper sintering.


The circle with bronze in the middle and copper around it looks different because I added Baldwin’s patina so you can see the difference more strongly between the copper and the bronze.

I think I’m going to try Hadar’s stove-top method for phase 1. Then I won’t have as many kiln factors to contend with. Kiln will only be for phase 2.

So I picked up a camp stove burner for $9 at K-Mart. May try this later today.

So my latest questions are:

1) How fast (or slowly) do I cool my items after phase 2? Do I open the kiln lid as soon as the holding time is up? I feel like I should because these fiber containers seem to stay hot for so long. But I don’t want to risk the integrity of the pieces.

2) To fire phase 1 on a stove-top, I’m supposed to put a hole in the lid of my fiber box. I can’t see where you can buy replacement lids for these so I’m hesitant to do that. The box is $26. But now I can’t remember what else I’d be using it for, so if I’ll always only be using it for base metal clay and I need a hole in the lid… I guess I’ll put a hole in the lid.

Sunday, June 3, 2012

More failed experimenting with base metal clay and my kiln

Did my first bronze/copper kiln test yesterday. For the most part, I followed Hadar’s way of testing (copper pieces, bronze pieces, copper in bronze pieces, bronze in copper pieces).

It was also the first time I used my new fiber firing bowl. I can’t tell you how FABULOUS it is to not have to vacuum out the inside of my kiln after each firing. (That black dust all over the kiln after firing base metal clay isn’t charcoal dust… it’s ash or firescale from the steel firing pan.)

The bad news, however, is that my bronze/copper pieces came out of the kiln seriously mess up.

If I’d known they were going to be that unrecognizable after the firing, I would have taken a photo of the pieces in their green state.

The bronze parts are all pitted, blistered, and misshapen. The copper looks best, but was only fired at 1470 external pyrometer reading (kiln setting 1370) so I’ll have to test them further to see if they’re fully sintered.

Aside from adjusting my kiln temperatures (see below), the only other changed factors were: new charcoal and a different firing bowl.

I placed ½ inch of carbon on the bottom of the firing pan, added my pieces, then covered them with 1½ inches of additional carbon. I did note that about ¾ an inch of the carbon had burned away during the second firing.

It is possible that things stayed hot for longer due to the new firing conditions, but I wouldn’t think maintaining the optimal temp could produce the effects of over-firing so severely.

Here was my set-up…
Media: bronze and copper separately and together, most pieces about 2mm thick
Kiln: top loading brick
Firing Container: round fiber firing container, no lid
Charcoal: coconut shell carbon, acid washed
Phase 1 Firing: full ramp to 1000 external pyrometer reading (kiln setting 870), hold for 1 hour (then opened the kiln and removed the bowl to cool)
Phase 2 Firing: full ramp to 1470 external pyrometer reading (kiln setting 1370), hold for 2 hours (did not open the kiln directly after firing)


The pitting makes me feel like I should place my coin-shaped pieces vertically rather than horizontally next time, but all the bronze pieces still look over-fired regardless.

So then I took one of the all copper pieces and started grinding it down, looking for signs of non-sintering.

The thing was sintered.

Extreme puzzlement.

Directions: copper and bronze both sinter at 1000, copper densifies at 1700 and bronze densifies at 1470.

Some of you know that I already suspected my kiln was running hot, so I recently purchased an external pyrometer (thermometer) and have been testing things out.

At lower temperatures (like 500 F), there is a 200 degree difference. At higher temperatures (like 1470) there is a 125 degree difference. This fluctuates, of course.

I will continue my tests, but if all else fails, I will swap out my kiln’s thermocouple and see if that makes a difference.

Here’s what bums me out (or confuses me, take your pick): The previous piece I fired was at a much hotter temp than yesterday’s test pieces.

It was in a stainless steel container and it was a much larger piece, but still… it was not fully sintered and had to be repaired and refired.

This was before I adjusted for my kiln’s over-firing, so it was being fired at much higher temperatures than my test pieces.

Can thinness/thickness have that much to do with temps? Can steel vs fiber container have that much to do with temps?

Okay, later today I’ll mix up some more text clay and see how it goes in round 2.

Stay tuned…

Saturday, June 2, 2012

Ah yes... my previous life

In trying to gather bead-related info from some very old blog posts of mine, I ran across this entry... totally not bead-related, but sure brought back memories.  This was actually pretty close to a typical day in the life (for 12 years)...


Tuesday, 01-03-06

Got up at 4:30 'cause DH was snoring.

Drank coffee in 3-second intervals 'cause one of the cats was having a puke-fest and the game was for me to find it before anyone steps in it.

Had to drag the dog outside for a pee (he's afraid of the rain) but I couldn't find any appropriate shoes so stood out there (in the rain) with white ankle socks and high-heeled dress shoes until the dog "performed".

Remade one of the lunches 'cause while I was outside with the dog one of the cats stole Gabe's lunch sandwich (I'm sure I'll find the remains of that within the week).

Got ready for my "relaxing time" in front of the computer (since I'd gotten up so early, surely I deserved some DOWN time) but instead found ants all over the keyboard and computer desk so spent 20 minutes removing everything from there and wiping it down then explaining to them that rain or no rain, this is MY house not theirs.

But the spray I used on the ants made me sneeze and my sneeze scared the cats and when the cats get scared they jump up in any direction, and apparently one of them wasn't too graceful and in his panic to escape my sneeze he knocked over a box of beads and jewelry.

I had to leave that mess for later 'cause it was getting to be time to get the kids up.

Oh great, they both suddenly REMEMBERED they both have homework due today.

It was agreed that I'd do Monica's typing if she'd do the recycling 'cause I type faster than she does and I could already hear the garbage truck on the next street over.

Then Gabe couldn't get his pen to work, but it HAD to be THAT pen 'cause that's what he started his homework with and he'd get a lower grade if he switched pens in the middle (sometimes I feel I should get confirmation of the stories I hear).

So I showed Gabe how to disassemble the pen and tap it to get the ink going, and then he cried 'cause when he went to re-assemble the pen he couldn't find one of the pieces and admitted he was using his sister's pen when she had specifically forbade him and now she was going to kill him.

Before I could come up with a wise and comforting response, I remembered I'm suppose to feed these kids before school so I alternated the appliances between the one electric socket they all share, reminding Gabe that if he got syrup on my beads ONE MORE TIME we'd have discipline issues to discuss.

Then I realized I'd better not leave the house without eating something myself, so I opened a can of tuna and grabbed a plastic fork.

Dang we were supposed to leave 10 mins ago and NO ONE eats in the new car so I carry my tuna upstairs and eat while combing my hair.

But while I'm in the bathroom I notice that the bottom of the bathtub is black which reminded me what I was supposed to remember last night, which was that I was supposed to clean the tub after it drained after my shower 'cause I dyed my hair but the tub takes 60 minutes to drain and I guess for some BIZARRE reason I got sidetracked last night (can you imagine??? Me, getting sidetracked?) so I'll try to remember to get some bleach on the way home so I can y'know... return the bathtub to it's normal color... sigh...

I continued combing my hair and doing my best to make sure the hairs falling copiously out of my head land closer to the garbage than to my can of tuna...

Somehow we make it into the car with only 3 return trips into the house for things the kids forgot.

I back down the driveway and Gabe says, "Blackie was under our tires."

Luckily, I see that the feral is faster at avoiding being run over than Gabe is at telling me about cats under my car and scooted out of the way; I reminded Gabe to next time tell me BEFORE I back down the driveway.

"You both got your gym clothes?" I ask, but the words were barely out of my mouth before I reprimanded myself for asking. After all, was I willing to go back? No. Then why even ask? Why set myself up for the grief…er, I mean knowledge that my kids were going to get a P.E. cut for not having their gym clothes today. I mean, it's not like they had two weeks to think about what they'd need to take to school with them on January 3rd. Oh wait… that's precisely what it's like. D'oh!

Mon thinks she doesn't have her shorts with her. Crap!

But wait, Gabe has an extra pair in his backpack. "You don't mind if they're dirty, do you?"

Mon responds, "Of course not."

I'm wondering if I get a vote in that.

Halfway to school Gabe does his usual, "Oh shoot!" (The definition for that is: I think I forgot something really important that I'll need today at school.)

He then spends the rest of the 15-minute drive taking EVERYTHING out of his backpack (which seems at this point like the bottomless pit of scribbled-on scraps of paper).

He finds "it"… whatever "it" was… a few seconds after pulling into the school driveway. "Mom, you needed to sign this before winter break," he says while handing me a pen.

He then asks how I can sign my name while staring straight at him.

Kissy kissy and reminders of tonight's schedule.

Now it's just me and my car, heading to the office.

And people wonder why I sometimes LIKE to go to work.


Friday, June 1, 2012

More enameling experiments

This week I experimented with soldering and more torch enameling. Here are my efforts (some are for sale, some aren’t… click a photo to find out which ones are for sale).