
Round 6:
Decided to fire my next crop circle, which is much larger and much thicker than my test pieces.
The set-up…
Media: bronze with copper inlay, thick and larger piece
Kiln: top loading brick
Firing Container: round fiber firing container, no lid for phase 2
Charcoal: coconut shell carbon, acid washed
Phase 1 Firing: camp-stove for 45 minutes
Phase 2 Firing: full ramp to 1300 external pyrometer reading (kiln setting 1200), hold for 2 hours
I rigged a little collar of tin foil above the campstove knob and below the gas outlet. After 45 minutes of maximum heat, neither the knob nor the top of the propane canister were hot.

So I sat there for 45 minutes, watching my fiber box heat up, but never saw the “binder burning off” smoke. Which also means I never lowered the temp to minimum.
Since this is a much larger piece than my test pieces, I was expecting MORE smoke, not less. The only thing I can think of is that this piece sat on my shelf for a month; maybe that changed things.
I did smell the same smell as when the previous pieces were burning their binder, so after 45 minutes I looked and the piece was black. I decided to go ahead and transfer it to the kiln for phase 2 (two hours holding time at 1300 degrees).
I anticipated a not-fully sintered piece. After all, my first crop circle, fired at a much higher temp wasn’t sintered in the first go ‘round. Why would I think firing at a LOWER temp would produce BETTER results?
So I pull the thing out of the kiln as soon as phase 2 is over (I still am not sure about the protocol on that) and see that:
A) The charcoal is not bright orange as on previous occasions, and…
B) Charcoal bits are stuck to one side of my lentil

D’oh! I forgot to place it vertically rather than horizontally. Oh well, next time. And once I brushed the piece, there was only one piece of charcoal stuck to it and I didn’t see any pitting.
Although there is no warping or blistering (yay!), the copper inlay appears unsintered in spots...
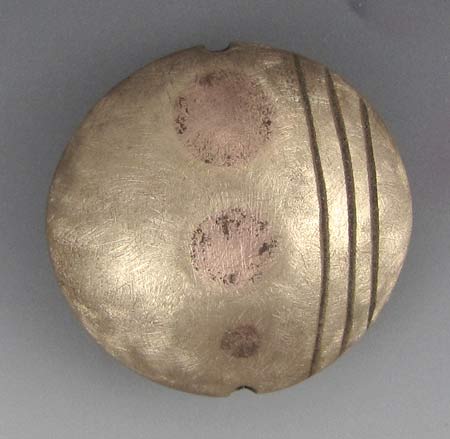
... so I applied more copper clay and re-fire phase two.
Out of the kiln for the second time… brass brush with water, then sanding through all the grits (400, 600, 1000, 2000, 3000, 4000), then Baldwin’s patina and voila! New crop circle is done (and I really love it). I’m trying to add a chain and get it photographed so I can list it tomorrow (along with a Cleopatra style beaded necklace made last week… and just chillin’ on the mannequin).
After oohing and ahing over my crop circle, I got side-tracked with soldering and enameling. I made five bases (places for me to enamel). They are copper disks with fine silver frame edging (I like something that HOLDS the enamel in).
Today was cut out copper shapes, fuse fine silver into rings, shape rings, clean copper and silver, solder rings to disks, pickle, rinse, file and hole punch.
Tomorrow the plan is to clean the metal again, counter-enamel, add base coat enamel, add cloisonné wires, wet pack enamel, fire, repeat, finish.
It will be my first time trying to apply a counter-enamel that isn’t black. :-)
No comments:
Post a Comment